Let’s Learn Git and GitHub in 2023


So I talked about becoming a full-stack developer in 90 days in one of my previous articles, and I thought about sharing my learnings here with you guys. What better way to learn than to teach? They say so, so here we are.
In this article, we will learn about Git and GitHub, two of the most popular tools in the modern software development industry. We’ll learn about basic git commands, which will help you get started using Git and GitHub.
What is Git and GitHub?
Before diving into Git and GitHub we should get ourselves familiar with version control systems. Version control systems are like a time machine for your code. They help you keep track of changes, undo mistakes, and work with others on your projects. They make it easy to go back to previous versions, try new things without losing your work, and collaborate smoothly.
Imagine you are working on a big project with multiple developers involved. Each developer is working on different features or making changes to the codebase. Now, consider a situation where you decide to add a new feature, spending time and effort to implement it. However, upon further evaluation, you realize that this feature doesn’t suit the project’s requirements or align with the team’s goals. In such cases, simply erasing the code won’t suffice, especially when many developers are simultaneously working on the project.
This is where Git comes in as a crucial tool. Git provides a distributed version control system that enables effective collaboration and tracks changes made to the codebase. With Git, every developer has their own local copy of the entire project, including its complete history. This means that each developer can work independently, making changes, adding features, or experimenting, without affecting others’ work.
GitHub is like a virtual hub for sharing and collaborating on code. It’s a website where you can store your code projects and work with others.
Let’s create a demo repo on Github to understand all the commands and their working:

Commands
Git clone
This command copies a remote repository (a project stored on a server) to your local machine. It creates a complete local copy that you can work with and make changes to.
Syntax:
git clone <repository_url>
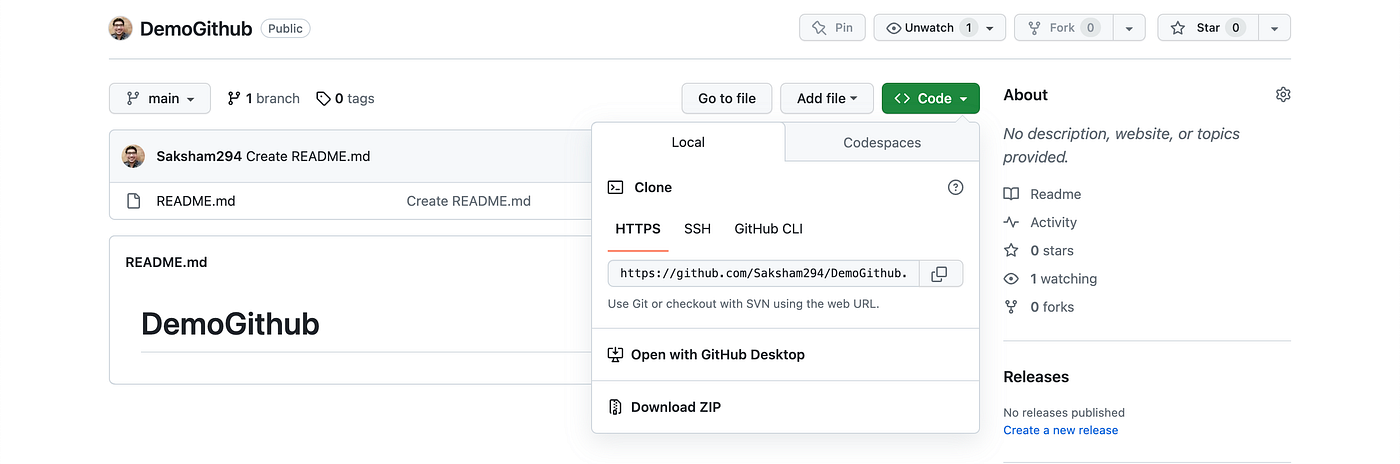
Copy the url in the HTTPS.
Now in your VS Code terminal:
Open a new folder
Open the terminal
Type the command given above and instead of <repository_url> paste the copied url. Hit Enter and you have cloned a git repository from GitHub.
Git add
This command adds specific files to the staging area, preparing them to be included in the next commit. Alternatively, you can use git add . to add all modified files in the current directory.
git add <filename>
Our repository is currently empty. Let’s add a basic text file.
- In your terminal type:
touch sample.txt
It will create a simple text file. Now as you have made changes in your repository git will track these changes. If you these local changes to be present on the main/remote repository then you will have to add the changes made.
2. Add the file name ‘sample.txt’ instead of <filename> in the above command
Git commit
This command creates a new commit with the changes that have been added to the staging area. The -m flag is used to provide a commit message, which describes the changes made in the commit.
git commit -m "Commit message"
Simple type any message in the above command.
Git push
We have created a text file on our local machine but now we want to push our text file to the remote repository. This command pushes the local commits to a remote repository. You specify the remote repository (e.g., origin) and the branch to which you want to push your change
git push <remote> <branch>
You can simply type git push if you don’t have any specific branch to push to.
Git pull
Let’s say another developer added a word file on the remote repository and you also want that file on your local machine. This command fetches and merges the latest changes from a remote repository into your current branch. It updates your local copy to reflect the most recent state of the remote repository.
git pull <remote> <branch>
Git branch
This command creates a new branch with the specified name. You can also use git branch without any arguments to list all existing branches or git branch -d <branchname> to delete a branch.
git branch <branchname>
Let’s say you’re working on a project and want to create a new branch called “feature-branch” to work on a new feature. You can use the following commands:
Creating a new branch:
git branch feature-branchSwitching to the new branch:
git checkout feature-branch
This command switches to the “feature-branch” you just created, allowing you to start working on the new feature.
By using git branch and git checkout, you can easily create and switch between branches, enabling you to work on different features or experiments without affecting the main codebase.
That’s all for today. There are many more commands you can use while working with git, but the above ones are the basic ones and will help you get started.
Any suggestions are highly welcome, thank you for reading.
Feel free to connect with me on other platforms: LinkedIn GitHub Twitter